Install An Endpoint Agent
Use this guide when you need to connect a new computer to Pharaoh without asking the person at the computer to run commands, edit config files, or know your backend details.
This flow can also appear as the optional Endpoint setup step during organization onboarding. If you skip it during onboarding, use this guide later from Endpoints.
The primary enrollment path is:
- An operator opens
Endpointsand startsConnect a computer. - The person at the computer downloads Pharaoh from
https://getpharaoh.com/downloads/. - They open Pharaoh and either enter the install code or let an IT admin sign in on that computer.
- Pharaoh shows
This computer is connected. - The operator verifies the new machine from the connect flow or from
Endpoints.
During onboarding, the same intent is condensed: generate a short-lived enrollment token, open the installer workflow when needed, or mark a detected endpoint as the first onboarding endpoint. The full Connect a computer flow remains the best path when you need recipient details, support-ticket context, or recent-code management.
Before You Start
Section titled “Before You Start”- You need an operator account that can manage endpoints.
- You need permission to install software on the target computer.
- You need to know who will complete enrollment:
- the person at the computer with an install code
- an IT admin signing in directly on that computer
- You do not need to share a backend URL, organization ID, YAML file, or CLI command for the primary path.
Decide the enrollment purpose before you generate the code. Use a self-service code for a known user or remote worker, and reserve direct IT admin sign-in for hands-on provisioning, lab machines, or cases where the user should not handle the code.
Step 1: Create An Install Code
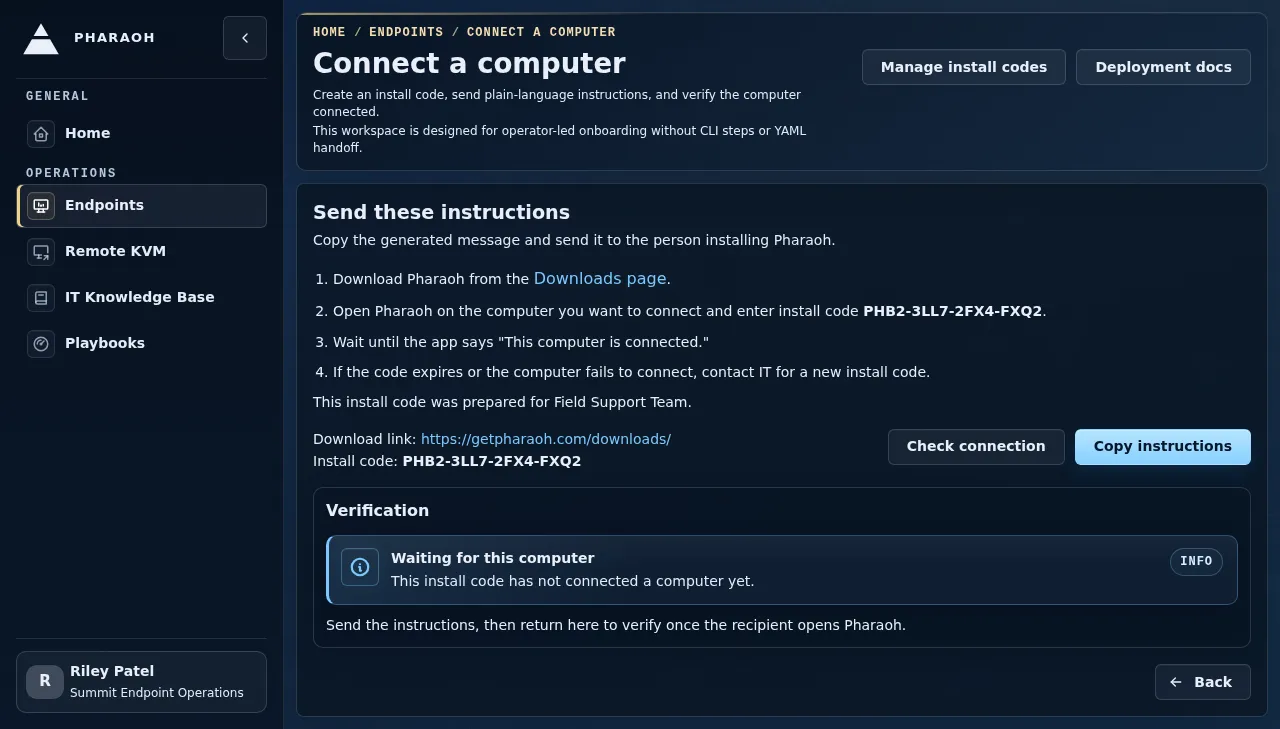
Section titled “Step 1: Create An Install Code”Go to Endpoints, then select Connect a computer.
The page is a guided three-step flow:
Details: enter the recipient and optional endpoint context.Generate: review the enrollment settings and create the install code.Instructions: copy the ready-to-send message and verify whether the computer connected.
Use the Details step to:
- choose the enrollment purpose
- set how long the code stays valid
- set the maximum number of uses
- add optional pre-registration details such as owner, department, location, groups, tags, support ticket, or expected hostname
Then select Review and generate code, confirm the summary, and select Create install code.
For one computer, use a short validity window and the pre-registration details to keep the code tied to the intended request. Shorter expiration windows reduce cleanup work when a user delays installation or a support ticket changes hands.
Step 2: Send The Download Link And Install Code
Section titled “Step 2: Send The Download Link And Install Code”After the code is created, Pharaoh moves to Instructions.
Select Copy instructions, then send the built-in message through your normal support channel.
The primary message should tell the recipient to:
- Open
https://getpharaoh.com/downloads/ - Download Pharaoh for their computer
- Open Pharaoh after installation
- Enter the install code from IT
- Wait for
This computer is connected
If the person at the computer should not use a code, tell them to open Pharaoh and hand the computer to IT so an administrator can finish enrollment from the local sign-in screen.
Use the optional owner, department, location, support ticket, and expected hostname fields when your team needs to reconcile new inventory against a request queue. Those details help catch a code used on the wrong computer.
Step 3: Install Pharaoh On The Computer
Section titled “Step 3: Install Pharaoh On The Computer”Use the installer that matches the computer:
- Linux: the Linux download from
getpharaoh.com - macOS: the macOS download from
getpharaoh.com - Windows: the Windows download from
getpharaoh.com
After installation, Pharaoh starts automatically on Linux, macOS, and Windows and opens the local enrollment screen when the computer is not enrolled yet. On macOS, Pharaoh also appears as a menu-bar app for the logged-in user.
Step 4: Finish Enrollment On The Computer
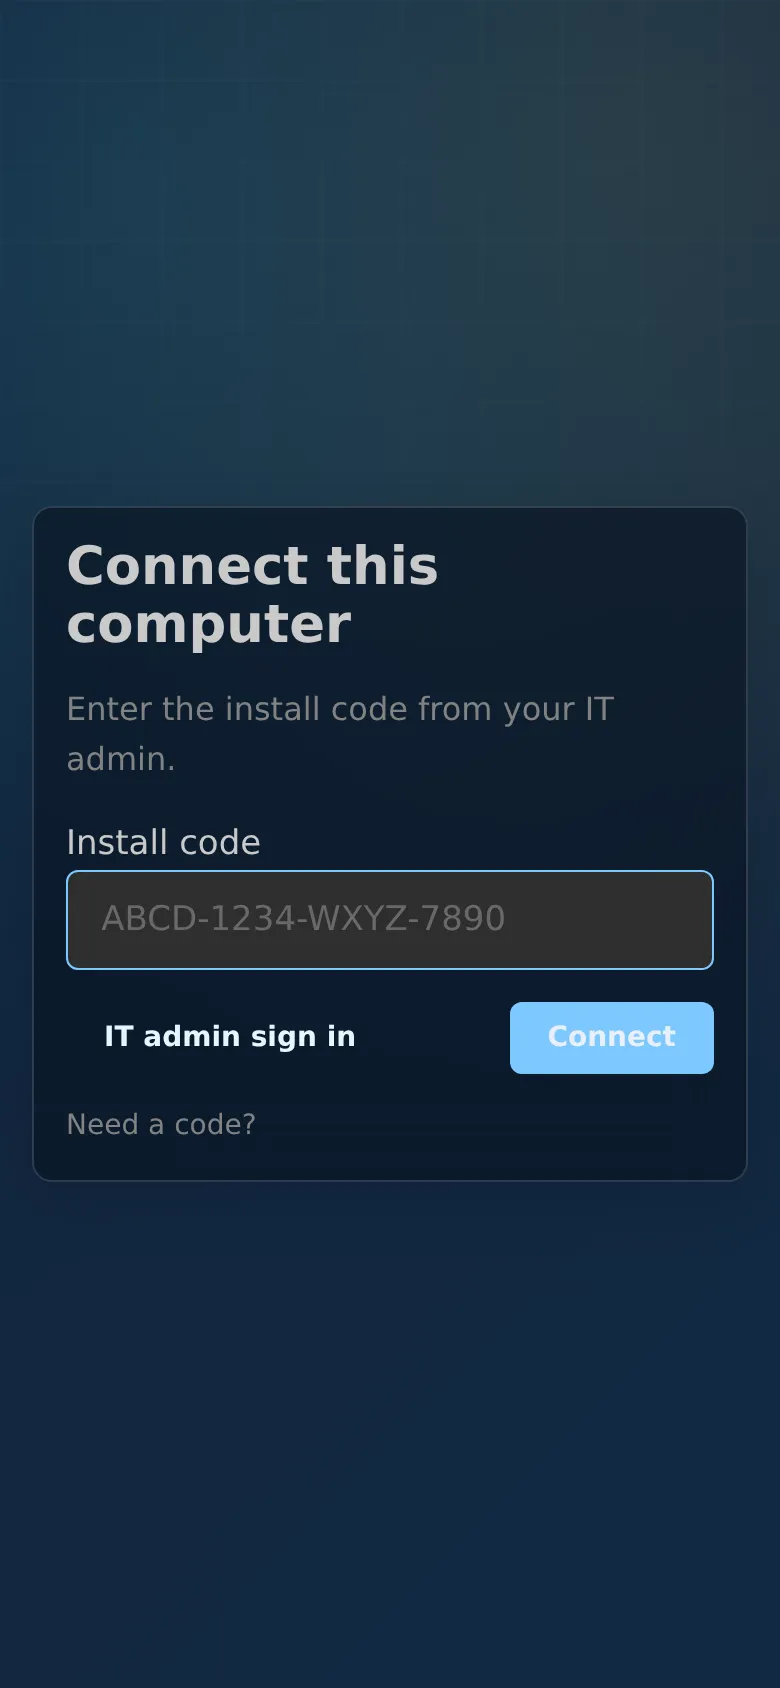
Section titled “Step 4: Finish Enrollment On The Computer”The local enrollment screen is titled Connect this computer.
From there, the person at the computer has two supported paths:
Install code: enter the grouped code from IT and selectConnectIT admin sign in: sign in with a Pharaoh administrator account, choose the organization when needed, add any optional endpoint details, then selectConnect this computer
What the person should see:
Enter the install code from your IT admin.when using the code pathSign in with your Pharaoh administrator account to connect this computer.when IT is doing the enrollment directlyThis computer is connectedafter enrollment succeeds
If a code is expired, revoked, already used, or the computer cannot connect, Pharaoh should keep the experience in plain language and the operator should issue a new install code instead of switching to a manual bootstrap flow.
If Connect cannot complete, first confirm the code lifecycle in Recent install codes, then confirm the computer can reach the network. Do not reuse a code marked Used, Revoked, Expired, or Failed for a different endpoint.
Step 5: Verify The Computer In Pharaoh
Section titled “Step 5: Verify The Computer In Pharaoh”Return to the Instructions step in Connect a computer and select Check connection.
Use that verification panel to:
- confirm whether it has connected a computer yet
- open the connected endpoint when enrollment succeeds
Use the main Endpoints list to confirm:
- the hostname appears in inventory
- the operating system looks correct
Last Seenis recent enough to show the agent is active
Success is not just code consumption. Treat enrollment as complete only when the connected endpoint record matches the expected user, hostname, location, or ticket context and the agent has checked in recently.
Manage Existing Install Codes
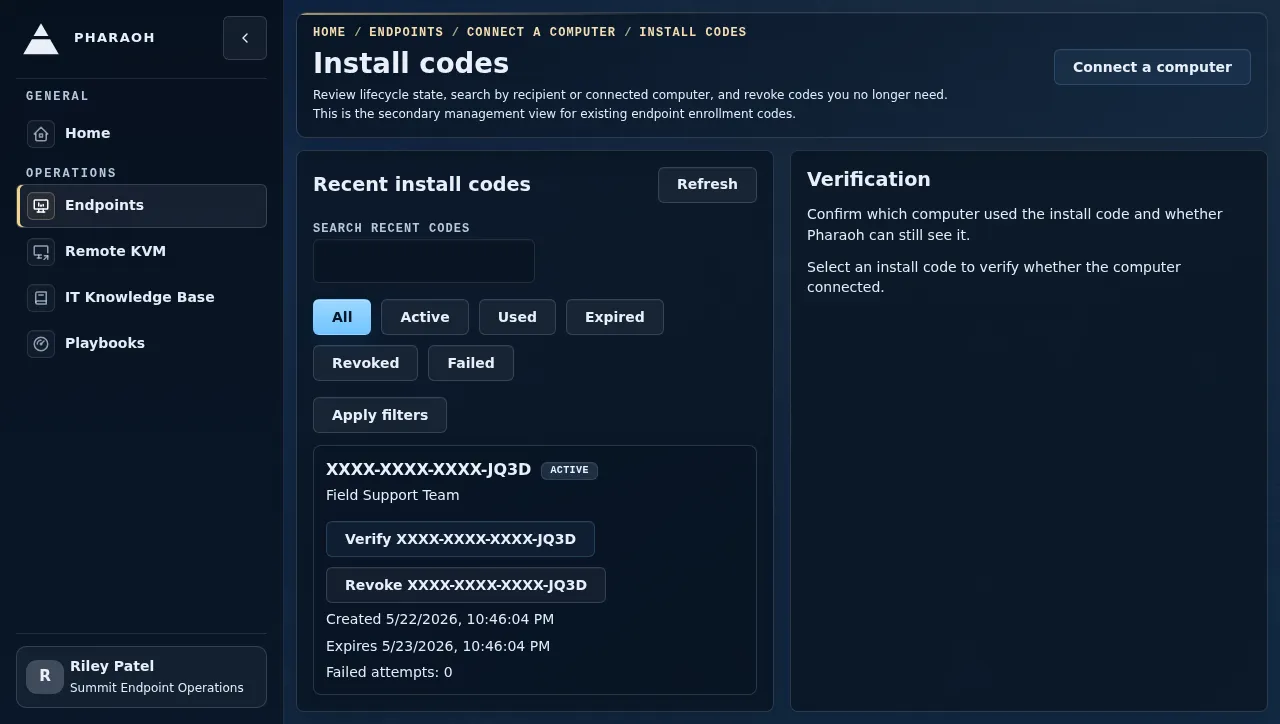
Section titled “Manage Existing Install Codes”The primary Connect a computer page keeps the current enrollment flow focused. To review older codes, select Manage install codes.
Use Install codes when you need to:
- search recent install codes by recipient or connected computer
- filter by active, used, expired, revoked, or failed status
- verify a code that was created earlier
- revoke a code that should no longer connect a computer
Advanced Deployment Note
Section titled “Advanced Deployment Note”This guide documents the customer-facing primary path. If you are doing a packaging, lab, or managed-deployment workflow that needs installer internals or agent-runtime details, use the public Pharaoh documentation instead of asking end users to work through backend URLs, org IDs, or bootstrap YAML:
macOS Validation Status
Section titled “macOS Validation Status”The current release is documented as implementation-ready for macOS enrollment, not fully real-device validated.
The required follow-up validation plan lives here:
- Endpoint Enrollment Agent Flow